Optimize your WordPress website to get the most out of your hosting package. With some adjustments, this popular CMS is also suitable for large websites.
Activate caching and Boost
Caching is the way to make WordPress faster. Caching frees up extra memory to your RAM to speed up your web hosting.
Your website will no longer need to retrieve certain data for each visitor from the database. Instead, it immediately retrieves that data from RAM, which drastically reduces the loading time.
Read how to activate caching on your web hosting
Add Redis caching to your WordPress website
Add Ramdisk caching to your WordPress website
Recommended: Make your website faster with Boost
WordPress settings and recommended plugins
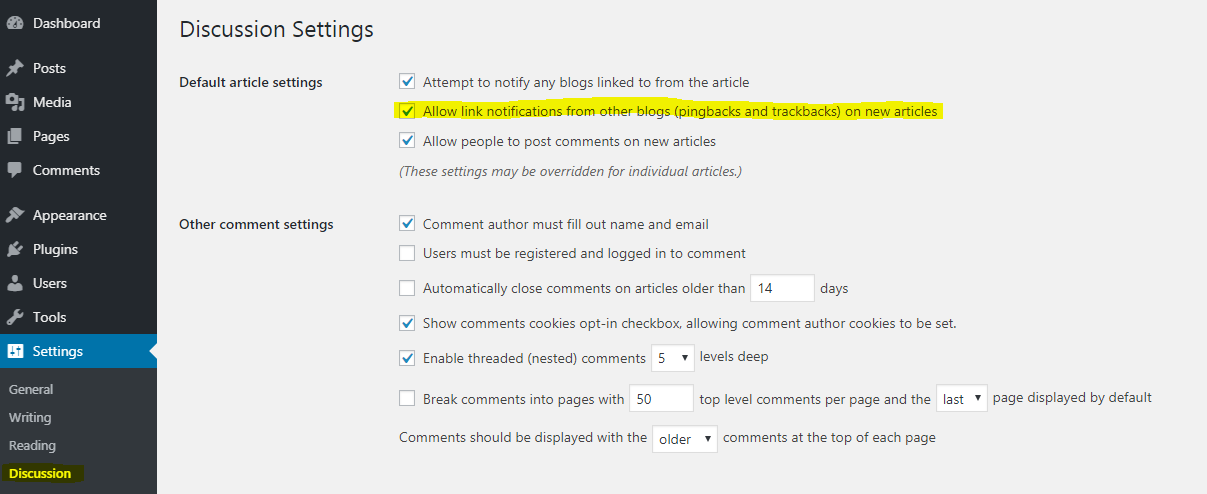
Disable pingbacks
Pingbacks are enabled by default on WordPress. They make it so other websites are notified when you link to them. But that creates many unnecessary queries.
Therefore, we recommend disabling pingbacks via the “settings” in WordPress (see image).
Compress images with WP Smush.it
WP Smush.it is perfect if you have a lot of images on your website that are not size optimized. WP Smush.it makes the images smaller so that they load faster.
2. Via the menu to your left, go to “Plugins” > “Add new”.
3. Search for the plugin in the search bar and click on “Install now” when you find it.
4. Installed the plugin? Go to “Plugins” > “Installed plugins” to activate the new plugin. Only now the plugin will start working.
An alternative is the automatic compression of WordPress done from “Settings” > “Media”.
Optimize your database with RVG-Optimize Database
RVG-Optimize Database optimizes the tables in your database(s). You also clean up the clutter in your database(s). Easily remove revisions from posts, pages etc.
2. Via the menu to your left, go to “Plugins” > “Add new”.
3. Search for the plugin in the search bar and click on “Install now” when you find it.
4. Installed the plugin? Go to “Plugins” > “Installed plugins” to activate the new plugin. Only now the plugin will start working.
Activate HTTP/2 server push
Does your website work via HTTPS (because you have an SSL certificate)? Then we recommend to also activate HTTP/2.
With HTTP/2, multiple files can be sent via multiplexing over a single connection at the same time, resulting in a faster website.
An extra step is to activate HTTP/2 server push. This is a technique that will further reduce the loading time of your website.
You will need to install the HTTP/2 server push plugin. It ensures that all scripts and files that use the “enqueue mechanism” are sent to the browsers via preloading.
Optimize for mobile devices with the AMP plugin
To optimize your website for mobile, you should use Google’s AMP project. AMP stands for Accelerated Mobile Pages. By removing a lot of “clutter” from your website (eg certain design elements, scripts …), your website will work a lot faster.
Install the AMP plugin on your WordPress website. https://nl.wordpress.org/plugins/amp/
2. Via the menu to your left, go to “Plugins” > “Add new”.
3. Search for the plugin in the search bar and click on “Install now” when you find it.
4. Installed the plugin? Go to “Plugins” > “Installed plugins” to activate the new plugin. Only now the plugin will start working.
Optimize the .htaccess file
With a few adjustments to your .htaccess file, you optimize WordPress for a large number of visitors. An overview of recommended adjustments!
Activate GZIP-compression
Compress various files on your website. This ensures less bandwidth consumption and, above all, a shorter loading time.
- Activate GZIP-compression vie the control panel
- Add the code below to the .htaccess file
<IfModule mod_deflate.c>
<FilesMatch "\.(html|php|txt|xml|js|css)$">
SetOutputFilter DEFLATE
</FilesMatch>
</IfModule>
Alternative: add Deflate Compression by adding the code below to your .htacces file.
# START DEFLATE COMPRESSION

	AddOutputFilterByType DEFLATE "application/atom+xml" \
	"application/javascript" \
	"application/json" \
	"application/ld+json" \
	"application/manifest+json" \
	"application/rdf+xml" \
	"application/rss+xml" \
	"application/schema+json" \
	"application/vnd.geo+json" \
	"application/vnd.ms-fontobject" \
	"application/x-font" \
	"application/x-font-opentype" \
	"application/x-font-otf" \
	"application/x-font-truetype" \
	"application/x-font-ttf" \
	"application/x-javascript" \
	"application/x-web-app-manifest+json" \
	"application/xhtml+xml" \
	"application/xml" \
	"font/eot" \
	"font/otf" \
	"font/ttf" \
	"font/opentype" \
	"image/bmp" \
	"image/svg+xml" \
	"image/vnd.microsoft.icon" \
	"image/x-icon" \
	"text/cache-manifest" \
	"text/css" \
	"text/html" \
	"text/javascript" \
	"text/plain" \
	"text/vcard" \
	"text/vnd.rim.location.xloc" \
	"text/vtt" \
	"text/x-component" \
	"text/x-cross-domain-policy" \
	"text/xml"

# DEFLATE COMPRESSION
Activate Expire headers
By enforcing expire headers you ensure the caching of certain file types. This ensures that they are always in the cache, making them load faster.
Add the following code to your .htaccess file.
	# BEGIN Expire headers

  ExpiresActive On

  # Images
  ExpiresByType image/jpeg "access plus 1 year"
  ExpiresByType image/gif "access plus 1 year"
  ExpiresByType image/png "access plus 1 year"
  ExpiresByType image/webp "access plus 1 year"
  ExpiresByType image/svg+xml "access plus 1 year"
  ExpiresByType image/x-icon "access plus 1 year"

  # Video
  ExpiresByType video/mp4 "access plus 1 year"
  ExpiresByType video/mpeg "access plus 1 year"

  # CSS, JavaScript
  ExpiresByType text/css "access plus 1 month"
  ExpiresByType text/javascript "access plus 1 month"
  ExpiresByType application/javascript "access plus 1 month"

  # Others
  ExpiresByType application/pdf "access plus 1 month"
  ExpiresByType application/x-shockwave-flash "access plus 1 month"

# END Expire headers
Add cache control headers
Cache control headers define files that can be cached by the browser.
Add the code below to your .htaccess file:
# BEGIN Cache-Control Headers

<filesMatch "\.(ico|jpeg|jpg|png|gif|swf|pdf|svg|js|flv)$">
Header set Cache-Control "max-age=84600, public"


# END Cache-Control Headers
Disable entity tags
Entity tags is a mechanism that checks whether the files in the browser cache still match the files on the server. By switching this off, a faster loading time can be achieved. Although the result differs from website to website.
Add the following code to your .htacess file:
	Header unset ETag
	FileETag None
Neutralize image hotlinking
Image hotlinking occurs when another website uses your images (they link directly to your image). That creates extra load on your hosting. You can prevent this in some cases by adding the following lines to your .htaccess file.
Don’t forget to change the domain name to your own domain name.
RewriteEngine on
RewriteCond %{HTTP_REFERER} !^http(s)?://(www\.)?yourdomainname.com [NC]
RewriteCond %{HTTP_REFERER} !^http(s)?://(www\.)?google.com [NC]
RewriteRule \.(jpg|jpeg|png|gif)$ - [NC,F,L]
Stop landing page redirects
When using GTMetrix, you sometimes get the following message:
“Avoid landing page redirects for the following chain of URLs”.
This occurs when you have an SSL certificate installed but do not have a direct redirect from HTTP to HTTPS.
To prevent this, add the following lines to your .htaccess file:
	#redirect non-www to www
	RewriteEngine On
	RewriteCond %{HTTP_HOST} !^www\.
	RewriteRule ^(.*)$ https://www.%{HTTP_HOST}/$1 [R=301,L]
Optimize the wp-config.php file
Limit the number of revisions of wp-config.php
There is no single button in WordPress to limit the number of revisions stored in your database. A large number of revisions will mean your website will go slower. Therefore, setting a limit is recommended.
Add the following code to your wp-config.php file to limit the number of stored revisions to 3:
define( 'WP_POST_REVISIONS', 3 );
To disable it completely, add the following code.
define( 'WP_POST_REVISIONS', false );
Stop WP-cron
WP-cron is allso called “a poor man’s cron”. It ensures that every time someone visits your website, a check is performed on whether there are any pending actions within WordPress. If that is the case, they will be executed immediately.
Disable this by adding the following code to your wp-config.php file:
define('DISABLE_WP_CRON', true);
If you still want to perform specific cron tasks automatically, you can do this via the crontab.
Create a cron job via the control panel with the following code:
*/30 * * * * curl -sLo /dev/null https://domain.extension/wp-cron.php?doing_wp_cron

