Advanced filtering is stronger than Basic.
IN THIS ARTICLE
- What does advanced spam filtering do?
- How to enable advanced spam filtering for the customers?
- How can my customers enable advanced spam filtering?
What does advanced spam filtering do?
- Advanced filtering will score your messages for probability of spam in the background:
- Messages with high probability will reach you, but the tag [SPAM] will be added to the subject.
- Messages with the highest probability will not reach you at all.
- Advanced filtering can be trained:
- If a spam message has reached you, you can forward it to Support as a .eml, or .msg attachment and they will teach the filter to recognize the message as spam.
- In case you know a message has been sent to you but you are not receiving it in your mailbox, you could contact Support to check if the message has been marked as spam. The message can then be released from the filter, if it is more recent than 1-week old. If the issue persists with a particular sender, you may ask Support to whitelist the sender for your domain. However, this is usually not recommended, as it will remove your spam protection from that particular source.
How to enable advanced spam filtering for the customers?
Advanced spam filtering is a feature you can make available in a service package.
Follow these steps in the control panel to activate this for your customers:
- Go to “Reseller”
- Choose “Service packages” in the menu on the left and then click on the three vertical dots menu next to the service pack you want to change and choose “Edit service package”
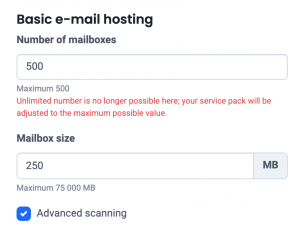
- In the section “Basic e-mail hosting” you tick the section “Advanced scanning”
- To confirm, scroll all the way down and click on “Edit service package”
How can my customers activate advanced spam filtering?
The advanced spam filtering is an extra anti-spam protection that can be applied both for Basic Email and Exchange Mail users.
Follow these steps in the control panel to activate it:
- Go to “My Products”> “Email Hosting”> Click the “Manage Email” button to the right of your domain name.
- Choose in the left menu for “Anti-spam settings”
- At “Type anti-spam” choose in the drop-down menu for “Advanced scanning”.
- Click on “Save settings” to confirm


