10 advanced tips for making your website even faster

A fast and high-performance website makes for happy customers! But there is always room for improvement, hence these 10 advanced tips for making a well-performing website run even faster!
Additional optimisation of your load time may have a large impact
 The importance of a high-performance website cannot be overemphasised. Your visitors will lose interest if a page takes longer than 3 seconds to load. It is possible to make an immediate 10% difference in online sales through loading faster by just half a second.
Not only does a high-performance website make for satisfied customers, but it also allows you to rank higher in the search results – Google does not just reward fast websites: before long, it will also penalise slow websites!
We have already provided you with all the ground rules for a high-performance website in our article 'A fast website thanks to a few magic tricks?' and our articles about high-performance WordPress and Drupal websites.
Are you dissatisfied with your website? Perhaps your site is already fast, but for you (and us too), only the very best result is good enough. If so, follow these expert tips. Any little gain in speed you can achieve might well make a difference to the user experience and Google ranking.
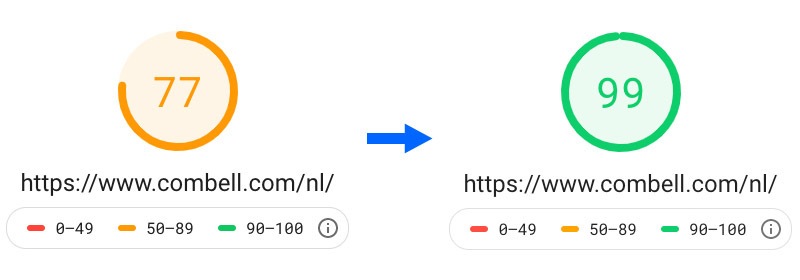
Based on these tips, we have optimised the performance of our website combell.com, and this has resulted in a higher PageSpeed score.
Closely monitor your website’s vital signs!
 How can you find out how ‘healthy’ your website actually is? By testing it for yourself on Google’s PageSpeed test. You do not just get the numbers, but an instant list of options for improving.
In its assessment, Google evaluates ‘web vitals’; these are the essential indicators that show how healthy a website is. Each of these figures represents a facet of the user experience and shows a user’s real experience in the field.
Currently, the Core Web Vitals are concerned with the loading, the interactivity and the visual stability of your website:
- Largest Contentful Paint (LCP): measures the load performance. For a good user experience, this must be less than 2.5 seconds from when the page begins to load.
- First Input Delay (FID): measures the interactivity, how quickly the page responds to an action by the user. For a good user experience, the IFD must be below 100 milliseconds.
- Cumulative Layout Shift (CLS): measures the visual stability - e.g. that, during loading, the text does not keep jumping continually. For a good user experience, a page needs to have a CLS of less than 0.1.
WebDev tells you more about these vital signs, and discusses the tools you can use to carry out the measurements with code. Alternatively, you can use the Web Vitals extension for the Chrome browser.
With the Web Vitals and the Google PageSpeed test, you are equipped with objective figures that enable you to set about cranking up performance with the tips provided below.
These 10 tips can crank up your performance either in combination or individually:
→ Tip 1: WebP images
→ Tip 2: Native LazyLoading
→ Tip 3: Critical CSS
→ Tip 4: Preload external content
→ Tip 5: Display swap for fonts
→ Tip 6: Replace external scripts
→ Tip 7: JavaScript Async/Defer
→ Tip 8: Enable HTTP/2
→ Tip 9: Caching with Varnish/Redis
→ Tip 10: Caching in the browser
1. WebP images are up to 45% lighter than PNG or JPG
Appearances count, so attractive images will give your website a lot of allure. Everyone knows you should not upload really heavy images at full size – these can be disastrous as far as fast loading your page is concerned.
But you can go even further with your optimisation. Do this by converting your images to the WebP format instead of using PNG or JPG image format.
On average, the WebP format developed by Google makes images 45% smaller than compression in the older image formats.
You can easily convert JPG or PNG images via WebP-converter or equivalent tools. This means some work to start with, but this modification will really pay dividends! It is a one-off job initially, and then you just need to remember to take it into account when you add new images to your page.
Please note: although most browsers support WebP, that is not (currently) the case with Apple’s Safari browser. For that reason, it is important to load in the WebP versions of your images conditionally. Then, depending on browser support, you will display either a WebP version or a JPG/PNG version of the image.
This can be via the <picture> element or server side.
<picture> method:
<picture>
    <source srcset="img/awesomeWebPversion.webp" type="image/webp">
    <img src="img/JPEGimage.jpg" alt="Alt tekst">
</picture>
Server method:
By placing this code in your .htaccess file, all JPG/PNG images are replaced automatically by WebP images if the browser supports this. Make sure that the WebP version of your image is located in the same server folder as your JPG/PNG image. (Source: Vincentorback)
<IfModule mod_rewrite.c>

RewriteEngine On

# Check if browser supports WebP images

RewriteCond %{HTTP_ACCEPT} image/webp

# Check if WebP replacement image exists

RewriteCond %{DOCUMENT_ROOT}/$1.webp -f

# Serve WebP image instead

RewriteRule (.+)\.(jpe?g|png)$ $1.webp [T=image/webp,E=REQUEST_image]

</IfModule>

<IfModule mod_headers.c>

# Vary: Accept for all the requests to jpeg and png

Header append Vary Accept env=REQUEST_image

</IfModule>

<IfModule mod_mime.c>

AddType image/webp .webp

</IfModule>
TIP 1: Also optimise your JPG or PNG images
As the Safari browser does not (currently) support WebP, the JPG/PNG versions of your images will still need to be loaded in. You should also compress the JPG/PNG images. For example, you can use TinyPNG for this.
TIP 2: Always specify a width and a height for images
Make it easier for the browser always to give the correct width and height as attributes to images. This enables the browser to know straight away how much space an image will take up because the image ratio is defined.
So get into the habit of using the following syntax for each <img> tag:
<img src="image.jpg" width="120" height="100" />
2. Load only what is necessary with LazyLoading
LazyLoading works by delaying the loading of images and iframes that are not visible until the user scrolls nearby. When an img or iframe tag is present in the HTML code and is processed by the browser, then the sources will be loaded in immediately. This blocks the full loading of the page. And consequently produces a longer load time. LazyLoading ensures that the user downloads only what is visible.
It is really simple to apply this: you just add the loading="lazy" attribute to your images and iframes. A good habit to get into when programming a hyperfast website.
Syntax:
<img src="image.jpg" loading="lazy" />
<iframe src="https://example.com/" loading="lazy"></iframe>
Please note: Safari currently does not support lazy loading via attribute. However, that can be solved by using this polyfill (read more).
3. Critical CSS: Loading in CSS files for the above-the-fold section immediately
As you know, CSS (Cascading Style Sheets) files contain a specific format for your page so that all the pages are consistently formatted. The big advantage is that if you want to change the style, all you have to do is merely change the CSS file and not each individual page.
You can include CSS in the HTML code itself, or you can call up a central file on each page. That means that the browser has to download and process the CSS files before the page can be displayed.
Therefore, CSS can be a source that holds up display. If the CSS files are large, or if the network conditions are poor, then requests for CSS files can be delayed, and the time taken to display a web page may lengthen considerably. You can avoid this by making use of Critical CSS.
Critical CSS allows you to include the styles needed for the ‘above the fold’ section, i.e. the very first content the user sees before starting to scroll, in the <head> section of the HTML document. As a result, no extra request has to be made for fetching these styles. The remainder of the CSS can be loaded asynchronously. CriticalCSS.com is a service that can help with this.
4. Load external content in advance with preload, prefetch and other <link rel> tags
 You can also gain time by loading in advance content that will be called up later on the page, or preparing to do so. That may involve preloading a CSS file, searching for a domain name, etc. As a result, the content is ready and your visitor does not have to wait for it when it is actually needed.
This instruction is given with the <link rel> tag. There are 5 different attributes that you can use with this.
preload: download with high priority a source such as a script or a stylesheet, and keep it in cache. The browser does nothing with that source, so scripts are not executed for example. They are simply put into cache so that they are available immediately when required.
Syntax:
<link rel="preload" href="/style.css" as="style" />
prefetch: actually does the same as preload, but with low priority to prevent it getting in the way of more important sources.
Syntax:
<link rel="prefetch" href="/style.css" as="style" />
TIP: For both preload and prefetch, it is recommended to use the attribute ‘as’. That helps the browser to schedule the download correctly. Possible options are ‘as style’ for stylesheets, ‘as script’ for scripts, and ‘as font’ for fonts. A full list can be found at MDN.
preconnect: this is used to request the browser to establish a connection with a defined domain in advance. You use this when you know that the user will soon download something from that domain, though you do not know what exactly.
Syntax:
<link rel="preconnect" href="https://example.com" />
dns-prefetch: you ask the browser to execute a DNS resolution of a domain in advance. You use this when you know that a connection will have to be made to that domain, e.g. to use a font from Google Fonts, or to use React from a CDN.
Syntax:
<link rel="dns-prefetch" href="https://example.com" />
prerender: you request the browser to load a URL and load that page in an invisible tab. If your visitor clicks on that URL, the page is displayed at once.
Syntax:
<link rel="prerender" href="https://example.com/about.html" />
Read more about the link rel tag.
5. Load fonts in with display swap
Loading an (external) font can also cause a delay. Especially when you use different versions of a font. But you can also improve that.
Using the font display swap CSS property, you instruct the browser to use a standard font first until the external font has been downloaded. The fonts are swapped as soon as that has happened.
@font-face {
  font-family: "Open Sans Regular";
  font-weight: 400;
  font-style: normal;
  src: url("fonts/OpenSans-Regular.woff2") format("woff2");
  font-display: swap;
}
Do you use Google Fonts? If so, add the following code to activate font swapping:
https://fonts.googleapis.com/css?family= Roboto:400,600&display=swap
TIP: Preload this resource
<link rel="preload" href="https://fonts.googleapis.com/css?family= Roboto:400,600&display=swap" as="style">
6. Replace external scripts with your own code
In all probability, your website makes use of external scripts, e.g. to show YouTube clips. Loading in these types of scripts always has a negative impact on your website’s performance. Consequently, you should first check whether it is necessary to load this external script.
Example: Replace YouTube/Vimeo embeds by screenshots
Embedding video players from YouTube or Vimeo on a web page involves a load of additional resources that slow down your website. A simple solution is to replace these video players by screenshots. You then effectively only load in the video player or link through to YouTube/Vimeo when someone clicks on the screenshot. Consider giving your image a ‘play’ icon.
7. Do not let JavaScript block the processing of the rest of the page
Another factor that can disrupt rapid display is the use of JavaScript, external or otherwise. If your visitor’s browser encounters in the HTML code an instruction to load a JavaScript, it will proceed to fetch it and execute the script. Only after that will the browser continue processing the remainder of the code. This has a huge impact on a page’s load time.

You can prevent this in various ways.
Do not place the script tags in the <head> tag:
In general, the script tag belongs there, but it causes major slowdown. One solution is simply to place the script tag at the bottom of the page, right before the </body> tag.

This method is used mainly when you want to provide support for older browsers. But there are 2 new tags that can help with new browsers: async and defer.
Use Async and Defer in modern browsers:
Async: The script is fetched asynchronously, and when it is ready, HTML processing is paused to run the script and then resumed.
Syntax:
<script async src="script.js"></script>

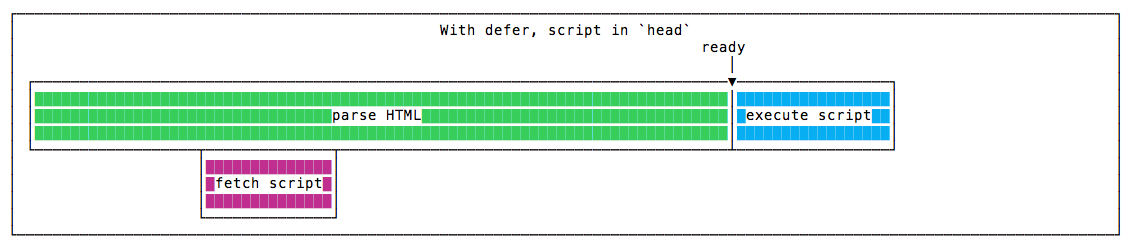
Defer: The script is fetched asynchronously and executed only after the HTML parsing has been completed.
Syntax:
<script defer src="script.js"></script>
You can also use both attributes, in which case async is given priority in a modern browser. Older browsers that support defer but not async will then switch to defer.
Please note: By applying async and defer to your JavaScript files, you are influencing the point in time at which these scripts are executed. Be sure to have a look at the results of using these techniques.
TIP: Delayed loading of scripts
Do you have an external script such as a Chat widget? In that case, opt to load this in subject to a delay, e.g. after 3 seconds. By this means, that script will not have any impact on the initial page load time.
8. HTTP/2 allows you to load more files at the same time
 HTTP/2 is the new version of the HTTP transfer protocol. It is the successor to HTTP/1.1 that dates back to 1999, and it improves the old protocol significantly in various ways:
- Multiplexing: At version 1.1, the protocol can only retrieve the files one by one; moreover, nowadays most websites retrieve content from multiple sources, such as advertising networks, content delivery networks, etc. However with HTTP/2, multiple files can be transmitted simultaneously over a single connection via multiplexing.
- Header optimisation: redundant headers are removed and the remaining headers are compressed.
- Server push: the server does not wait until the client initiates a connection but sends sources proactively to your visitor’s browser. The server knows, as it were, what content the browser needs to render the page and will push these data to the browser.
TIP: With Combell, you can easily enable HTTP/2 via your control panel. Read more in our article: Boost the load speed of your website with HTTP/2.
9. Make use of Varnish/Redis caching
Caching via the server is a technique used primarily for dynamic pages – those which are composed on the fly when a user visits them. Data are retrieved from a database and inserted into the website’s template. The result is then displayed to the visitor. This could be your product page with images, descriptions and prices, for example. Or pages produced via a Content Management System like WordPress.
If certain pages do not change, or change only occasionally, it is not really necessary to rebuild them upon each visit – it is smarter in this case to hold them in cache at the server.
There are various technologies for this, such as Varnish and Redis. Our article Make your website lightning fast using caching gives you a clear explanation of how this works. Our e-book about caching, and more specifically Varnish, provides you with a practical guide to best practices for caching.
10. Let your visitor’s browser cache as well
In addition to caching on the server, you can also have files stored in the visitor’s computer’s cache. When the visitor lands on your website for the first time, your code is sent from the web server to that visitor’s browser. It is not necessary for all content to be sent again each time your visitor returns to your website. You can save a lot of time by fetching files from the cache as opposed to loading them via the network again.
You can add an expiry date that tells the browser how long it should retain the asset in the cache. If, for example, you set the expiry date to 1 month, the browser will display that image from cache for a month and not request it from your server. Setting an expiry date can mean a massive time saving!
The HTTP headers are an instruction to the browser as to the validity of the file. If the page is stored in cache, the file is fetched from there rather than from the server until the cache has expired. As soon as the cache expires, the file is stamped as such and a new version has to be fetched from the server.
Include the Expires Header/Cache-Control code in your .htaccess file
Depending on your setup, you can then configure how long certain type of assets are to be cached. The code for configuring this is processed in the .htaccess file.
Example:
ExpiresActive On

ExpiresByType image/jpg "access plus 1 year"
ExpiresByType image/jpeg "access plus 1 year"
ExpiresByType image/gif "access plus 1 year"
ExpiresByType image/png "access plus 1 year"
ExpiresByType image/webp "access plus 1 year"
ExpiresByType image/x-icon "access plus 1 year"
ExpiresByType image/svg+xml "access plus 1 year"

ExpiresDefault "access plus 1 month"
In this example we keep all images in cache during 1 year.
Read more about Expires Header / Cache-Control.
Contact our Performance Team for tailored advice
There you go... We have now shown you 10 ways in which you can improve your website so that it loads faster and delivers better performance. You may still have questions about all this, or perhaps these tips have not resolved your specific problem. If so, our Performance Team will gladly work with you to establish where the bottleneck is and what options are available for addressing it.
Would you like a faster website but lack the necessary technical knowledge? Our Managed Hosting could be the answer to that. We look after the technical side so that your website runs like clockwork. And you can focus on your core task: selling your product and making your users happy!
Related posts